• People's Choice
      • Back
      • Consulting
          • Back
          • J2EE
              • Back
              • Websphere
          • Collabortation
              • Back
              • IBM Connections
          • OpenSource
          • Kontakt
      • build:skills
          • Back
          • Colaboration
              • Back
              • Admin
                  • Back
                  • W-A-S
                  • WPS
              • AppDev
                  • Back
                  • W-A-S
                  • WPS
                  • Web Experience Factory
          • Kontakt
          • Notes/ Verse
              • Back
              • Admin
              • Development
              • Interfaces
          • OpenSource
          • Literatur
          • Schedules
      • Schedule
      • Cloud
          • Back
          • Container
  • Jobs
      • Back
      • Offers
  • Über uns
  • Support
      • Back
      • FAQs
          • Back
          • Groupware
          • Traveler
          • WebSphere
          • Office
          • OpenSource
          • Other
      • Sonstiges
          • Back
          • Meldungen
          • IBM Infos
          • Lotus
          • WebSphere
          • Redbooks
          • Docker
          • Kubernetes
      • News
          • Back
          • Domino
          • Traveler
          • WebSphere
          • WebSphere Portal
          • Connections
          • Sametime
          • Docker
          • Kubernetes
      • Download
          • Back
          • WebSphere
          • Notes
          • Other
      • Discussion
  • Log in
Entwicklungsbuch

IBM Infos

Bewertung: 5 / 5

lot_markIBM Notes installation on Ubuntu 12.10 and 12.04 LTS

If you want to use the current LTS release 12.04 or the current release 12.10 it is highly recommended to use the 32-bit version of the operating system even if you have more than 4Gb of RAM installed on your pc.

If you really need to install a 64bit version of Ubuntu use the installation script from Mat Newman (very helpfull, Mat. Thanx for sharing it).

If you decided to use the 12.04 LTS version you should now use the ubuntu software center to install a different kernel. Best choice is a so called PAE-Kernel, which means that you still run a 32-bit operating system which aftwerwards will be able to use 36-bit of memory, which means up to 64Gb of Ram. This might be enough for your laptop ;-).

If you installed 12.10 there is no need to install a different kernel because the generic kernel already has enabled the PAE-feature.

The next step is just for 12.04 users.

kap03-035

After installing the new kernel and rebooting your machine check whether you have the right kernel up and running by typing to a shell

uname -r

which results in something like this:

kap03-036

On 12.10 you will just get something like

kap03-040

which is perfectly good enough for us.

After that you have to install some ubuntu libraries to meet all dependencies of IBM Notes. Do a

sudo apt-get install libgnomeprint2.2-0 libgnomeprintui2.2-0 libgnome2-0 libgnomeui-0 libgconf2-4 libgnome-desktop-2-17 libjpeg62 libxss1 ttf-xfree86-nonfree


That's it. After that you can start to install IBM Notes. Switch to the directory where the instalation files are located (eg a network device mounted at /media/install) and start the installation of IBM Notes there by typing

sudo ./smartupgrade.sh

This will install the current version of IBM Notes 9. After finishing the Installation start IBM Notes the first time to configure it correctly.

All components that are shiped will be installed. There is no realy need to install additional libraries to be able to work with IBM Notes on a 32-bit Version of Ubuntu Desktop.

After that, enjoy your IBM Notes client on Ubuntu.

kap03-041

And your PC has a lot of available memory.

Systemueberwachung

If you want to see this as a video have a look at

Any questions or any feedback to this article? Use the button in the right panel to contact us.
Bewertung: 5 / 5

IBM Connections: wsadmin commands in batchfiles or shell-scripts

If you want to generate more complex jython scripts to be executed on IBM Connections environments you will recognize that you allways have to draw the decision on which server this should be executed. If you have an easy infrastructure you will be prompted to choose either 1 or 2.

This will work if you use wsadmin in commandline mode. But if you start to generate your own jython scripts you might want to execute them without being prompted. The most easiest way to solve this is to start your script with a variable.

Example:

import sys

batchMode=1;execfile("communitiesAdmin.py")

.......

The batchMode Variable predefines the serverdecision and you will no longer been prompted. Be aware that the name of the variable is case sensitive.


Have fun

Bewertung: 5 / 5

ws markPassworddecoder for WAS-Passwords

We frequently have the same problem on customer sides that we find WAS-installation (WebSphere Portal, IBM Connections, Sametime etc) and nobody remembers the passwords used for internal/ machine users.

If you look into config files you will find only the encrypted passwords.

Because of this you can decrypt your password using one of three methods.

  1. You can just search the web
  2. You can execute a long commandline on your server.

Examples for this with WAS Version 8

../java/bin/java -Djava.ext.dirs=/opt/WebSphere/AppServer/deploytool/itp/plugins/com.ibm.websphere.v8_1.0.201.v20111031_1843/wasJars/ -cp securityimpl.jar:iwsorb.jar com.ibm.ws.security.util.PasswordDecoder {xor}HQkdb2Y=

encoded password == "{xor}HQkdb2Y=", decoded password == "BVB09"

Same for version 7

WAS Version 7

../java/bin/java -Djava.ext.dirs=/app/websphere/appserver/deploytool/itp/plugins/com.ibm.websphere.v7_7.0.3.v20110824_2356/wasJars/ -cp securityimpl.jar:iwsorb.jar com.ibm.ws.security.util.PasswordDecoder {xor}HQkdb2Y=

encoded password == "{xor}HQkdb2Y=", decoded password == "BVB09"

The most diffcult thing for us is to remember the command and the syntax to execute. Well, we wrote a scipt.

Feel free to copy it to your homedirectory and execute it (at your own risk). The script will check for the correct path and gives you the decrypted password on the command line.

Download here...... 

Bewertung: 5 / 5

Python Macros in LibreOffice on a Macbook

To be able to execute Python macros in LibreOffice it is necessary to configure your macOS to be able to execute the code. First of all, you need to install LibreOffice.

There are several ways to store Macros in LibreOffice:

  1. Macros could be used by all users of the device
  2. Macros could only be executed by the current user
  3. Macros could be executed by the user of a document or template

The macros must be stored in different paths if you want one of those three options.

For all users

Macros that should be used by all users of an Apple device must be stored in

/Applications/LibreOffice.app/Contents/Resources/Scripts/python/

 Store your macros as usual in a file with the filename <fileName>.py, After that you will be able to see the file inside the macro list in LibreOffice

For the current user only

Macros that should be used by all users of an Apple device must be stored in

–/Library/Application Support/LibreOffice/4/user/Scripts/python

 In my case, the subpath Scrips/python did not exist so I had to create the path.

mkdir -p –/Library/Application Support/LibreOffice/4/user/Scripts/python

If you store your python files here they will be visible in LibreOffice.

For the user of the current document or template

In this case Script/python folder must be created inside the document itself. Each LibreOffice file, whether it is an ods, odt or odp file, is some kind of a zip file. If go to the filesystem and unzip the file

unzip <myFile>.<odt|ods|odp>

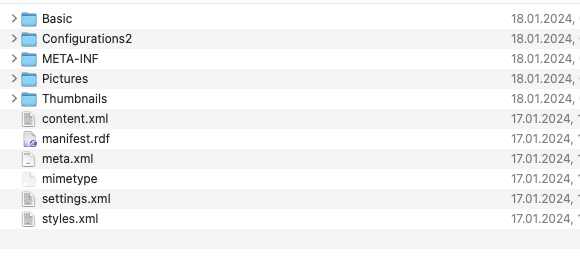
A structure of subdirectories will be created containing several kinds of files. It may look like this:

To add a Python macro to your document you need to create two subdirectories inside this directory structure. If you work with some kind of unix-like OS execute

mkdir -p Scripts/python

and copy your macro into the python directory. Last but not least you need to zip the structure again into an ods, odt or odp file.

cd directly to the top-level folder of your unzipped file like you see in the picture and execute the zip command

zip -r - . |dd of=~/<yourTargetDirectory>/<yourFileName>.<ods|odt|odp>

This command may look strange to you.  The parameter -r includes all subdirectories, and the dash - sends the output to the standard output (the screen). This will be used by dd (disk dump) to create a new file.

If you open the file in LibreOffice it will be recognized as a non-regular file because you added some files to the file structure. LibreOffice can repair this and give you the ability to open the document. The macro will be visible but cannot be executed because of the macro security in LibreOffice. You can adjust this behavior in the settings menu.

The next article will explain how to create a macro that adds some text and tables to your document.

have fun!

Bewertung: 5 / 5

Downloading M32 Updates automatically

We recently created a python application to automatically download software, firmware and other components from the differnet company websites of Music Tribe (c). 

The python script is downloadable from this website or from github. The python script needs to be configured using an ini-file. If it will be configured correctly and the script will be called eg. once a day using crontab or some other regular mechanism the script will check all configured Music Tribe (c) sites to download the newest versions of the software. 

The script will read the downloadPath variable from ini-file and create subdirectories for each brand name, category, product, type and subtype. The script allways check whether a file is available in your download path and will only download files that are currently not available. No old files will be deleted. 

The email  notification subprocess will inform you when a new file has been downloaded. If there are several files you will only receive one email containing all new filenames.

Configuration of INI-File

The ini-file contains three main sections:

  1. [Global]: 
    1. There is only one entry here: downloadPath. Specify the full path to the targetdirectory where all files should be stored.
  2. [Mail]
    1. In this section are several adjustments necessary:
      1. fromaddr: Defines the email-address that sends you a notification about newly downloaded files.
      2. toaddr: Defines the email-address that should receive updates about newly downloaded files.
      3. SMTPserver: specifies the name of the smtpserver which should receive the email. Currently there is no authentication implemented. We will update the software to enable authentication.
  3. [URL]
    1. This section contains all url of Music Tribe (c) brands to contacted and scanned for new updates. Each line contains defineable name (eg: M32C) and an rest-api url to be queried.
    2. The example urls on github and this site will be updated from time to time. Music Tribe (c) adjusts the parameters, brandnames, categories or model codes this and then so the urls need to be adjusted as well. 

This script has been works for us since four or five years. You are free to use the script. We are not responsible for any issues or defects that might ocure if you use this software. 

Weitere Beiträge ...

  • Releasing mouse pointer in virt-manager on macOs
  • M32 and X32 Version widget: installation video released
  • MacOS X High Sierra and X11 Forwarding using SSH
  • Off topic: iTunes Migration from one USB HD to a different one
  • 1
  • 2
  • 3
  • 4
  • 5
  • 6

Seite 5 von 6

Updates

  • JOB NOT BEING PROPERLY INITIALIZED USING JAVA BATCH
  • Compose Editing Evolved: Schema-Driven and Context-Aware
  • Docker Unveils the Future of Agentic Apps at WeAreDevelopers
  • IBM Power Virtual Server Guide for IBM AIX and Linux
  • The Definitive Guide to IBM Storage FlashSystem 5300 Port Configuration
  • IBM WebSphere Application Server and WebSphere Application Server Liberty are affected by a security bypass vulnerability (CVE-2024-56339)
  • GoFiber v3 + Testcontainers: Production-like Local Dev with Air
  • PH64682:IBM WebSphere Liberty is affected by a security bypass vulnerability (CVE-2024-56339 CVSS 3.7)
  • PH64683:IBM WebSphere Application Server is affected by a security bypass vulnerability (CVE-2024-56339 CVSS 3.7)
  • Security Bulletin: IBM WebSphere Application Server and WebSphere Application Server Liberty are affected by a denial of service (CVE-2025-36097)
© 1999 - 2025 IT Knäpper
  • Nutzungsbedingungen und Disclaimer
  • |
  • Unsere Philosophie
  • |
  • Datenschutz
  • |
  • WIR
Feed-Einträge
Back to top